LG 383EER4004A Äkta OEM fjäderborttagningsverktyg för LG tvättmaskiner

Brand:LG

3.6/5

201.07

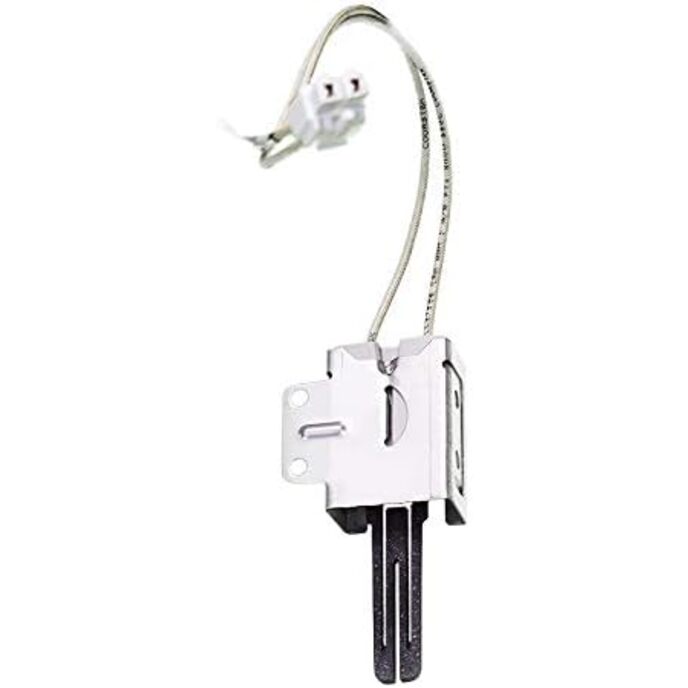
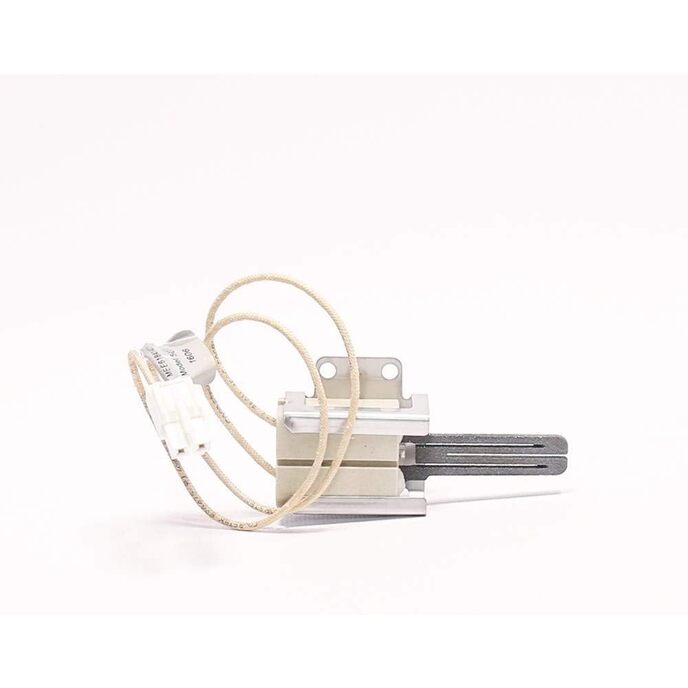
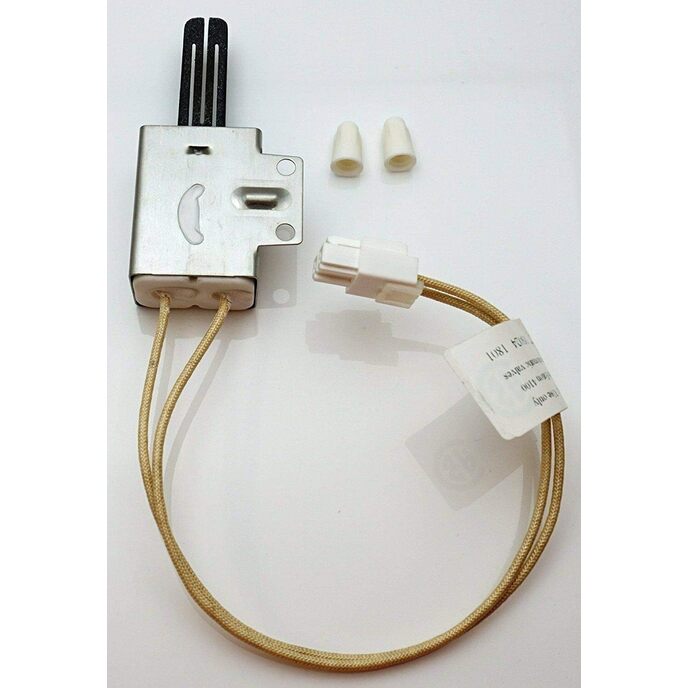
PRODUKTBESKRIVNING Denna högkvalitativa OEM LG ACW74118101 Frontkåpa för skafferilåda är tillverkad enligt exakta specifikationer med hållbara material och passar en mängd olika LG-kylskåpsmodeller. LG Door Pantry Drawer Front Cover är installerat på framsidan av skafferilådan. Erbjuder en snygg och pålitlig ersättningsprodukt för ditt LG Kylskåp gjord av genomskinlig plast för att främja synligheten av de lagrade föremålen. Kompatibla modeller: LBC24360SW,LDCS24223S,LFC24770ST,LFC24770SW,79571319310,LDCS24223W,LDCS24223B,LFC24770SB,71314,78044,7273702,727437,7474302,7243702,7474302,7474302 044,71313,78049,LBC24360ST,71319,79049,78043,LDC24370ST,79442,79043 ,71312,LFC24786ST,LDCS24223P,LFC24786SD FRÅN TILLVERKAREN LG MEE61841401 Ugns-/serietändare. För användning med följande LG Electronics-modeller: LRG3093SB, LRG3093ST, FG4331EB, FG4331ES, FG4341ES, LRG3095SB, LRG3095ST, FG4134EB, FG4134ES, LRG3097ST. Se din manual för att säkerställa att du beställer rätt, kompatibel del.

Inga enheter tillgängliga

EAN: 0734016679515

Kategorier Apparater, Tillbehör till stora apparater,

Reparera din apparat med tillförsikt när du väljer äkta LG OEM Factory-delar. Högkvalitativ OEM LG EBF61315802 tvättmaskinsbrytare är tillverkad med premiummaterial för hållbarhet och exakt passform, se till att följa instruktionerna i installationsmanualen när du installerar denna del. LG Switch Assembly förhindrar att tvättluckan öppnas under tvättcykeln eller centrifugeringscykeln. Ersättningsbrytare för LG tvättmaskiner och även kallad Washer Door Lock. Denna LG EBF61315802 är en äkta OEM-del (Original Equipment Manufacturer) tillverkad enligt exakta specifikationer.
Batteries Included? ‎No
Batteries Required? ‎No
Country of Origin ‎USA
Customer Reviews 4.5 4.5 out of 5 stars 561 ratings 4.5 out of 5 stars
Domestic Shipping Currently, item can be shipped only within the U.S. and to APO/FPO addresses. For APO/FPO shipments, please check with the manufacturer regarding warranty and support issues.
International Shipping This item can be shipped to select countries outside of the U.S. Learn More
Is Discontinued By Manufacturer ‎No
Item model number ‎MEE61841401
Item Package Quantity ‎1
Item Weight ‎5 ounces
Manufacturer ‎Geneva - LG parts - APA
Part Number ‎MEE61841401
Product Dimensions ‎9 x 2 x 1 inches
Thickness ‎11 Inches

3.6

9 Review
5 Star
80
4 Star
8
3 Star
5
2 Star
1
1 Star
6

Skriv din recension

Din e-post kommer inte att publiceras. Alla obligatoriska fält är markerade med*

Scritto da: Kindle Customer
installation is straightforward
Replacing this part took a while but was successful; my LG oven was failing to preheat in a reasonable amount of time (1+ hour or "F11" error). After the replacement it preheats to 350°F in 12 minutes. Tools needed: * Phillips head screwdriver * 5/16" nut driver or ratchet arm + socket with a 5/16" head * the igniter * probably something to hold a wire in place Suggestions: * Read the oven's user manual * Watch a YouTube video about this replacement proces Cautions: * This igniter is fragile. If you drop it, or put pressure on it, it will shatter. * Gas is scary. Be safe. Steps: 1. Unplug oven [1] 2. Remove racks 3. Remove oven door 4. Unscrew (2 screws) the oven bottom panel and remove that cover 5. Unscrew (4 screws) the burner shield [2] 6. Using a 5/16" socket on a ratchet or a 5/16" nut driver, loosen and remove the 2 mounting screws that hold the igniter in place [3] 7. PREPARE FOR THIS STEP: Have the new igniter nearby or have something to hold a wire in place nearby. Pull the igniter out of place. Hold on to its power cord tightly. Unplug the igniter side of the power cord and, still holding very tightly, either immobilize the oven side of the power cord [4] or attach the new igniter immediately. 8. Put the new igniter in place where the old one ones. Secure it in place using the mounting screws [5], which you can drive in with either a nut driver/ratchet or (not recommended) a Phillips head screwdriver 9. Replace the burner shield and screw it back in. [6] 10. Replace the oven bottom panel and screw that back in. 11. Replace door. 12. Replace racks. 13. Plug oven back in [7] All done! Footnotes: [1] The owner's manual says you should also shut off gas to the appliance when doing any maintenance. The YouTube video I watched did not say to do this and only said to disconnect power. I only disconnected power because the gas shutoff was obstructed by a desiccated dead mouse on a glue trap apparently left behind by the house's previous owners. [2] My LG oven's burner shield had a really hard to remove screw; it felt like it was stripped. It seemed like the metal warps easily and if you remove 3 screws it can be hard to remove the 4th stubborn screw. I dislodged it by (a) replacing all screws (b) unscrewing each screw loosely and (c) wiggling the burner shield around a little bit to find an angle at which the 4th stubborn screw was willing to come loose. Turns out it wasn't stripped but did have some charred food debris keeping it from easily turning. [3] As you go to remove or replace these two mounting screws, they can fall down into the hole that the igniter power cord comes from. If this happens, remove the warming drawer (consult manual for steps - involves removing 2 screws and pulling 2 plastic tabs to release), then grab the screw from a little tray under the oven that appears designed to catch fallen screws. Removing the drawer also gives you access to the floor under the oven, which is how I removed the desiccated dead mouse and glue trap. [4] If you fail to immobilize the power cord or reattach it, it may fall down. To get it, remove the drawer then reach back behind the drawer to the power cord and push it back up through the hole. [5] See [3]. [6] It's tough to get the angle right when replacing the burner shield. I screwed in 3 screws moderately loosely and the 4th wasn't lined up with the hole. I tried again, attaching them one at a time and making sure each screw fit, and it worked OK. It's also easy to drop these screws, so be careful (I found a random loose screw elsewhere in the oven apparently from someone else's prior repairs of some kind). [7] See [1].
Scritto da: Andre Williamson
Fast shipping, installed it myself the day after it arrived. Works like a charm!
Easy-to-use install.
Scritto da: Raul P Flores
Save Money and time by replacing the oven igniter yourself!
The oven igniter fits a number of different stoves. Due to this, you need to cut the wires from the old igniter and pig tail then together to the new igniter. The other thing that needs to be done, is to use the old clip from the old igniter. This is easy to do by spreading the old clip and placing it to the new igniter. I recommend that you go to YouTube and review how to replace the igniter. I would also recommend that you remove the oven door as it makes it a lot easier to work inside the oven. Doing this yourself, will save you lots of money from having to do a service call and paying over $100 for a new igniter. It really is easy but watch the video first on YouTube!
Scritto da: Deneen Smith McGhee
Do It Yourself If You Can
Bought this ignitor for my LG LRG3091ST/03 gas oven after reading several of the reviews here. I put a rush job on it and received it the next day. I am a baker and I needed it fixed immediately. I had been getting the F-11 error code for a while. The oven would take a while to heat up. I would get the F-11 error code then I would have to turn the oven off and then restart it again. My husband, Jeff, and I looked at the video on how to replace the ignitor and it looked pretty simple. It took him literally 20 minutes at the most to install the new ignitor. When replacing the ignitor make sure to unplug the oven and turn off the gas. By installing it ourselves it saved us hundreds of dollars because a repair person would have milked the job and probably charged twice as much for the part. So, thanks so much for the reviews. They really helped us out considerably and now I am able to continue my baking.
Scritto da: Awas
OEM Igniter
This came quickly, easy to install and works great. I opted for the OEM only because I have tried the after market igniter, although it held up, but thought let me go back to the original.
Scritto da: Jennifer Whitehead
Fast delivery!
I ordered this and received it within 4 days during covid times. My hubby YouTube how to install and did it within 15 min. Oven works great so far! Totally worth the money. I got a quote from a company and to buy and install it was going to be around 600 dollars!!! Saved over 400!!!
Scritto da: chantal
What I needed
Peed a little bit more than a knock off part but I did not have to splice anything it was easy to install and works great
Scritto da: Tom Lanson
Best place to get an LG Ignitor.
Excellent price, fast shipping, identical to original part, oven works good.
Scritto da: Randy Chartrand
Works like a charm
Was easy to install and now I have an oven again without having to spend more money on a repairman.

Relaterade produkter

hot
hot
Jackson 84150036035 Spraygardin
0.1/5

€ 148.53

Jackson 84150036035 Spraygardin
0.1/5

€ 148.53

hot
Henny Penny 49367 Montering 5-polig plint
0.1/5

€ 122.18

Henny Penny 49367 Montering 5-polig plint
0.1/5

€ 122.18

hot
Perlick 50248A6 kemisk pumphuvud, 4 skruv
0.1/5

€ 338.73

Perlick 50248A6 kemisk pumphuvud, 4 skruv
0.1/5

€ 338.73

hot
hot
Kolpak 291211075
4.1/5

€ 72.10

Kolpak 291211075
4.1/5

€ 72.10

Upptäck vårt internationella nätverk

Vi skickar till 28 länder, över 200 000 produkter. Håll dig uppdaterad, prenumerera på nyhetsbrevet.

Array