Celestron – NexImage Burst Color Solar System Imager – Astronomikamera för månen och planeter – 5 MP kamera för Astroimaging – Hög upplösning – Ultrakänslig ON Semiconductor MT9P031 CMOS-sensor NexImage 5MP – Solar System Imager

Brand:Celestron

2.9/5

329.76

AVANCERADE FUNKTIONER: Integrerat IR-skuret optiskt fönster, valbar del av intresseområde, 2x2 och 4x4 binning, progressiv skanning, integrerade C-trådar för direkt anslutning till ett teleskop. MACHINED ALUMINIUM 1,25” PILA: Denna standardstorlek gör denna kamera kompatibel med nästan alla teleskop som accepterar 1,25” okular och låter dig även använda dina okularfilter med kameran. INNEHÅLLER SOFISTIKERAD KAMERAKONTROLL OCH STAPNINGSPROGRAM: Se och spela in livevideo på din dator, stapla de skarpaste bildrutorna för den bästa bilden och justera alla bildinställningar manuellt. 5 MP FÄRGBILDSENSOR: Njut av skarpa, detaljerade bilder tack vare sensorns Micron DigitalClarity-teknik som dramatiskt minskar bildbruset. Små pixlar ger subbåge-sekund planetariska detaljer med de flesta teleskop. DET BÄSTA SÄTTET ATT KOMMA IGÅNG MED ASTROIMAGING: Fånga fantastiska bilder av månen, Jupiter, Saturnus, Mars och mer med denna lättanvända, plug-and-play planetkamera.

AVANCERADE FUNKTIONER: Integrerat IR-skuret optiskt fönster, valbar del av intresseområde, 2x2 och 4x4 binning, progressiv skanning, integrerade C-trådar för direkt anslutning till ett teleskop. MACHINED ALUMINIUM 1,25” PILA: Denna standardstorlek gör denna kamera kompatibel med nästan alla teleskop som accepterar 1,25” okular och låter dig även använda dina okularfilter med kameran. INNEHÅLLER SOFISTIKERAD KAMERAKONTROLL OCH STAPNINGSPROGRAM: Se och spela in livevideo på din dator, stapla de skarpaste bildrutorna för den bästa bilden och justera alla bildinställningar manuellt. 5 MP FÄRGBILDSENSOR: Njut av skarpa, detaljerade bilder tack vare sensorns Micron DigitalClarity-teknik som dramatiskt minskar bildbruset. Små pixlar ger subbåge-sekund planetariska detaljer med de flesta teleskop. DET BÄSTA SÄTTET ATT KOMMA IGÅNG MED ASTROIMAGING: Fånga fantastiska bilder av månen, Jupiter, Saturnus, Mars och mer med denna lättanvända, plug-and-play planetkamera.
Brand Celestron
Color Black
Connectivity Technology Infrared, USB
Customer Reviews 3.9 3.9 out of 5 stars 720 ratings 3.9 out of 5 stars
Flash Memory Type SD
Has Image Stabilization Yes
Included Components USB cable, 1.25" nosepiece, NexImage 5 Solar System Imager
Is Discontinued By Manufacturer No
Item model number 93711
Item Weight 4.4 ounces
Lens Type Zoom
Manufacturer Celestron
Model Name 93711
Product Dimensions 4 x 1 x 4 inches
Special Feature Lightweight, Low Light
Video Capture Resolution 720p

2.9

9 Review
5 Star
56
4 Star
15
3 Star
9
2 Star
6
1 Star
15

Skriv din recension

Din e-post kommer inte att publiceras. Alla obligatoriska fält är markerade med*

Scritto da: Ruja
NexImage 5 camera needs TLC to use reliably
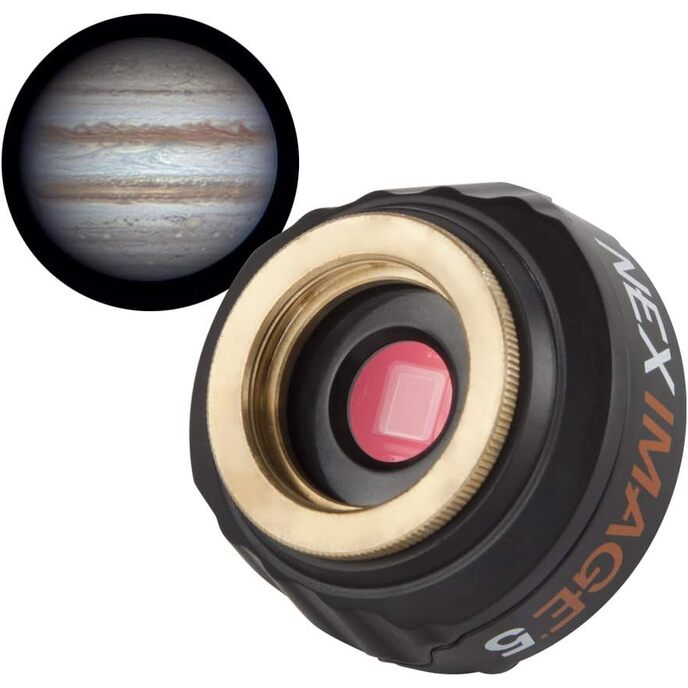
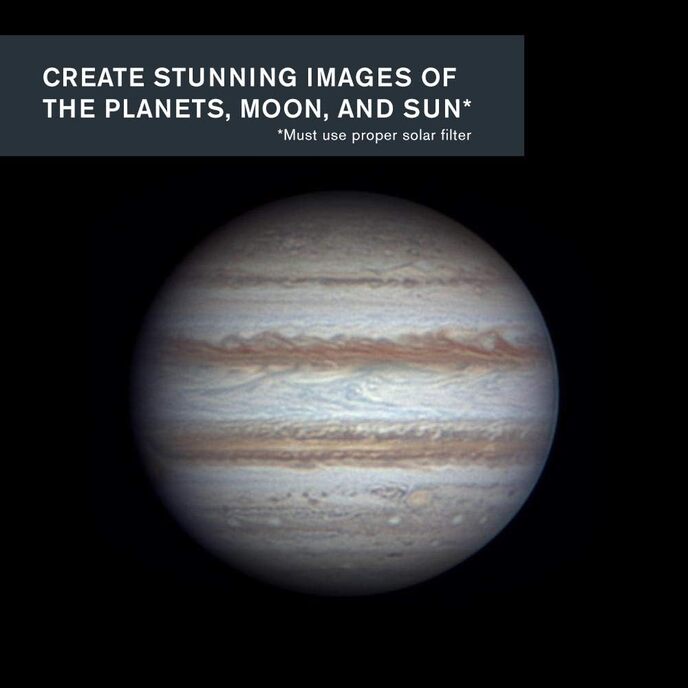
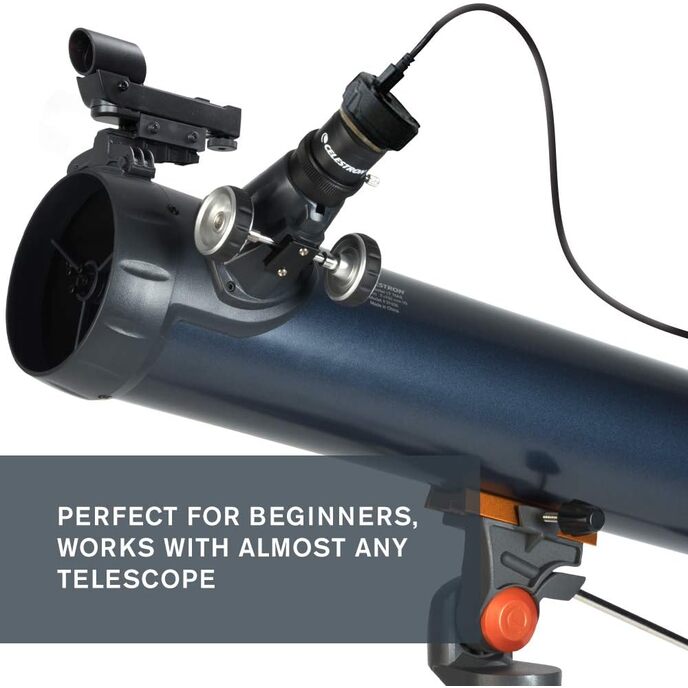
The Celestron NexImage 5 camera is a modified webcam, designed specifically for taking pictures of solar system objects. That means Sun, Moon, and the larger/closer planets. It really isn't made for taking pictures of very faint deep sky objects. So, as far as the hardware being able to meet that requirement, it does meet it quite nicely. Whatever efforts Celestron put into creating this product though, it was all at the hardware end. The software that comes with the camera on CD does work, but it quite dated. It hasn't been updated in years. Fortunately, the only software that has to be installed from the disk are the camera drivers on the CD. However, the drivers also have an update available from Celestron's website, and I would definitely recommend getting the update for the driver. I've heard that the camera drivers only work reliably with Intel processors though, and may have issues with an AMD based system. I didn't risk testing this, as I had an i5 Intel based laptop available. The included ICAP and Registax 6 sofware on the CD, while usable, can be ignored. I ended up using FireCapture for taking my pictures from the camera, and AutoStakkert! 2 for the digital image processing requirement. Both of these software packages are available for free off the Internet, and are currently supported by their creators. There is a learning curve to use both programs, but I found it well worth the effort needed to master them, despite the lack of written documentation available. Both have Yahoo groups to discuss using each program, and I've used the discussion groups to ask questions, and get relevant answers from an active user community. My other issue with the NexImage 5 camera though is not with the camera sensor itself, or with the electronics attached to it to make it work. The electronics are fine. The only other real issue I had was with the optical window that is placed in front of the sensor. This window has an anti-reflective coating on it. I suspect it also cuts out some of the infrared sensitivity that the camera may have. (I can't prove that though.) The coating works as designed. My problem came though when I was testing the system - telescope, camera, and laptop computer - with a glass solar filter to take pictures of the Sun. After the camera had heated up significantly, being used outside in 100+ degree weather, that coating on the window developed fringes that were clearly visible to the eye. This affected the images I recorded for the Sun and Moon in particular. Now while I admit that having the camera heat up some was not a good idea, I don't think it should have affected the window coating. The sensor recovered just fine. And because I'm stubborn, instead of sending the camera back to Celestron to get repaired, I just decided to resolve the issue myself. (I do have some professional experience with cleaning optics.) That adventure took a lot more time than it should have. I ended up having to use alcohol to clean off the fringes, and some of that window coating. Of course, getting rid of all the dust specs I introduced wasn't easy either. This is why most users should not attempt to open up a camera to clean the optics themselves. When the camera pixels are in the micron range, your eye just can't see the dust specs that can settle in there and affect the image. It took me two weeks to finish cleaning up that mess. So, just keep in mind that you have to be careful of the environmental factors the camera is subjected to, particularly heat. Moisture would also not be a good idea. If you remember that, and take advantage of the currently available programs on the Internet to run the camera, you will do just fine with it. However, don't feel bad if you decide to use something else either.
Scritto da: J. Palmer
Amaze your family and friends! Even with modest equipment, this camera produces excellent planetary images.
UPDATE 3/31: I removed a couple stars because after one year of careful use, the glass popped out of place. This let dust and dirt fall inside, and ruined future captures, even after gluing the glass back in place. I didn't drop or smack the camera in any way, and it was always carried in a padded case. I took it apart a 2nd time to clean the glass and sensor, and I saw that the sensor now had a scratch from the loose glass. When I cleaned the dust off of the sensor with dedicated sensor cleaning supplies, it scratched terribly. This all happened at the worst possible time, as I was working hard to capture Jupiter near the time of 2017 opposition. Since this happened after a year, and some of the damage was caused by my own actions, I had no choice but to replace the camera. Very disappointed. Original Review: Before I bought this camera, I was learning how to do Astrophotography one step at a time. First, I was snapping single frames with my Alpha A57 on a 130mm reflector. I could scarcely see a gap between Saturn and its rings, or see any type of detail on Jupiter's surface. Next, I learned how to take many pictures and stack them together. Now, I was getting little closer, but I was still very discouraged. Next came some video on a 8" SCT with my A57, followed with stacking in Registax, which produced some decent beginner images. After seeing some examples online of others' images, I knew I had to make the leap to a dedicated astro camera, if I were to make any progress. I've been very happy with that decision! Although it takes a little more planning to carry a laptop outside with me, it's completely worth it. The camera is surprisingly small and lightweight. It functions like a 5mm eyepiece, so I generally center the object with a low magnification eyepiece, then add the barlow and recenter, then add a high power eyepiece and recenter, then insert the camera. On the computer, select a large video size and adjust the exposure and focus the telescope until it comes into view. Then, you can begin adjusting the video size and make you final videos. I always do a couple videos for each combination of settings. Here are a few other suggestions based upon what I've learned so far about planetary imaging: 1. The best quality to file size ratio I've seen has been with the Y800 format. 2. I have to leave myself a lot of space around the planet, so that I can keep the disk away from any visible specks in the telescope. 3. I've had the best detail with a 3X barlow, with no binning. This is with an 8" Celestron SCT. 4. Quality is 60% seeing conditions, 30% post processing, and 20% telescope. If the planet is high in the sky and it's standing still, you're going to get a fantastic video. You will not be able to get a good final image if the planet is too wobbly. You just can't. I tried many times before I had the sense to just try again on another night. 5. Visit ClearSkyAlarmClock.com to generate customized advance notifications of good seeing conditions. If I didn't have that, I would have missed my best pictures! 6. Framerate is your friend; make it as high as you can by reducing the dimensions and using a faster shutter speed. 7. Use the histogram feature in iCap to ensure you're not overexposing. 8. The best viewing occurs near opposition and/or perigee, when the planet is brightest and/or closest, and only when the planet is high in the sky.
Scritto da: Jessie
Planetary Only
If you are new to astrophotography and on a budget, this will get you some decent pictures of the planets and moon but not much else. Don’t expect to get any nebulae or other deep space objects. I used this with my 8” SCT for a month or so but very quickly outgrew it and bought a better camera (zwo 294 pro). Don’t get me wrong though, it’s not a bad camera and it does what it says it will at a decent price point. But if I could do it again, I would of just saved my money from this and put it toward a better camera.
Scritto da: Jason
I got it to work with windows 11!
My husband bought be this camera and we were not sure it would work on windows 11. After several hours of frustration, I finally got it to work. First, I did have to use the disk to install the drivers and software as windows 11 does not trust the iCap software. I got everything downloaded and the camera still was not recognized. This is what I did. Settings >privacy and security > camera > turn on camera access and turn on let apps access your camera, and make sure iCap is on. You can check to make sure it’s working my going to camera device settings and look under connected cameras and check to make sure it’s seen. I hope this helps!!
Scritto da: A. N. Myers
Brilliant product
This product is the absolute nuts. I've had my 6 inch Celestron Nexstar for 2 years now, and living in London with its attendant light pollution issues, I've just about exhausted the range of visible objects I can observe. I'd taken to lugging the telescope across the country to dark areas to observe the fainter stuff. So I decided to have a go at astrophotography. My first efforts, connecting a DSLR camera to the scope with a T-ring, proved OK, but since the camera only provides the equivalent magnification to a 25 mm eyepiece, I wasn't getting much in the way of impressive pictures, although I got some nice snaps of the moon. So, I got this little camera for Christmas. I'm absolutely delighted with it. It's obviously no good for deep space objects, but for bright planets it provides amazing results. The magnification is impressive, and although it can take a bit of faffing about to get the object into the field of view on the PC and focus it, once you figure out how, it's a piece of cake. Youtube videos are great support, and there's an American chap who provides a really detailed and useful tutorial on the operation of both the iCap and the Registax software. It's delightful when your previously fuzzy images are transformed into really impressive pictures when you click the 'Do All' button! I've added a picture of Jupiter I took this morning so you can see how good the images are, and this was in pretty indifferent viewing conditions. Only downside it that the software is not Mac compatible, so I had to use my son's PC.
Scritto da: Amazon Customer
Early days but so far so good
It is much easier to take photos with this thans a typical SLR/DLR on the telescope. The video mode is great and the potential for this looking really good. Need to get more expierence with it mind. Only took a quick snap with the moon at around 06:00 in the morning so sun rise was on its way. Used with a Celestron 8SE.
Scritto da: Cornz
Works fine, expensive but if you like Celestron branded stuff then go for it.
The media could not be loaded. I'm going to highlight the one thing i dislike, the Micro USB3.0 port and the thick usb cable. The issue is as the scope moves, it flexes the heavy (good quality though) cable in the USB port on the camera. It's going to wear out that port in no time. The better option would have been a cable terminated in a usb connector as strain relief could then be applied. There is a 2mm gap all round the connector on the camera, i am going to use hot melt glue on mine to make the connector more rigid but even then, there is flex on the cable. Has to be a better way. 11/08/20. I found a better way that will result in far less strain being placed on that connector. A right angled USB3.0 connector on a short 6inch usb lead is a FAR better option. Video included.
Scritto da: Amazon Customer
There are better products out there!
This is my first feedback on the NexImage 10, I'll report back in a few months with an update, so far I've not been too impressed. The first challenge I had was that it would only work with the USB3 ports on my laptop and not the USB2 ports, so just be careful if you only have USB2 ports - I just have to move my mouse dongle each time I want to use the camera - I reported that to the Celestron help desk and they said 'great that you got it working'. The software that comes with the camera is quite complex to use and I never really got a reasonable image with it (iCap 2.3). After spending some time with Mr Google I found a software package called SharpCap, it was much simpler and the images seem much better. I still get some strange marks on my images, I can't see any marks on the camera lens, so this one still needs more investigation. So in summary... don't rush into buying the NexImage 10, it might be worth waiting to allow this product to become a little more mature, its a large expenditure at £270. 31st July 2017 - ok, I've given up, I just could not get it to work, everything I tried failed, I've just ordered a Skyris 274, 2.5 times the price but with great reviews and a mature product.
Scritto da: hookhead
A compact colour CCD camera
I thought long and hard about purchasing this camera. There were only 2 reviews, and both gave 1 star. I decided to go ahead buy it anyway, and so far I haven't been disappointed. The product is simply a CCD camera. It works and streams data to an attached computer. It requires a USB 3.0 port, because it is steaming lots of data in near realtime. I didn't try it, but streaming over USB 2.0 most likely wont work very well. I connected the camera to a MacBook Pro, and had no use for the included software. I did a cursory search of Google to find relevant software and downloaded oaCapture for Mac OS, and Lynkeos for Mac OS. I hadn't the first notion how to use these pieces of software, but in short oaCapture captures images in a movie format (.avi) and Lynkeos is used for stacking the frames of the movie later to produce a single image. I played around with both and finally got it to produce an image. There are two aspects to the product, the camera and the software. I think it is unfair to dismiss the camera as being bad, because of not being able to use capture/stacking software. I have no prior experience with Astro-photography, but I did have a sense of what I was trying to do. I managed to get it to work with about 30 minutes of play/Googling.

Relaterade produkter

Upptäck vårt internationella nätverk

Vi skickar till 28 länder, över 200 000 produkter. Håll dig uppdaterad, prenumerera på nyhetsbrevet.

Array