Genie Model GIRUD-1T lindrar frekvensstörningar i garagedörröppnare Fjärrkontroller uppgraderar de flesta större märken till Intellicode Security, svart

Brand:Genie

3.6/5

118.32

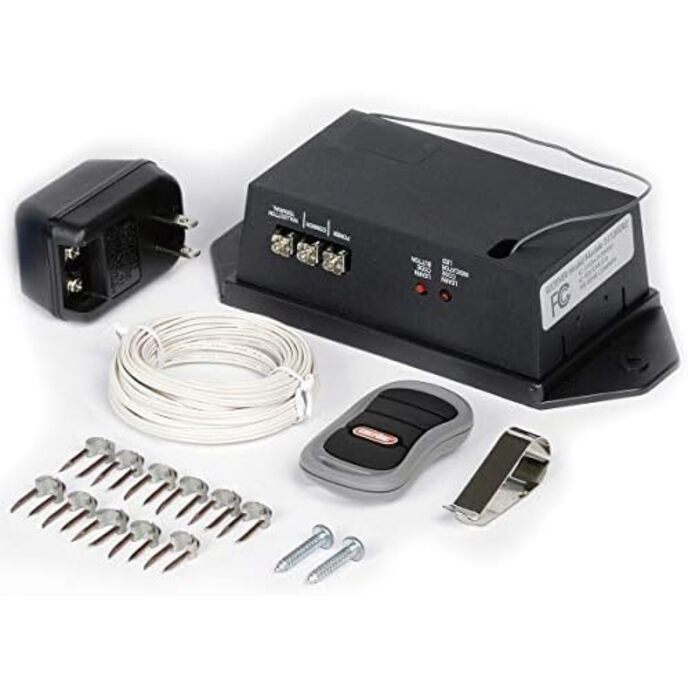
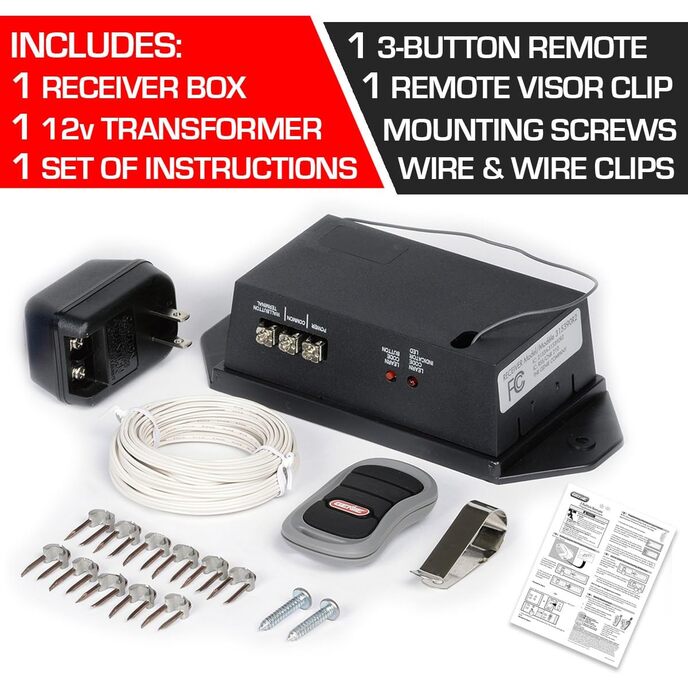
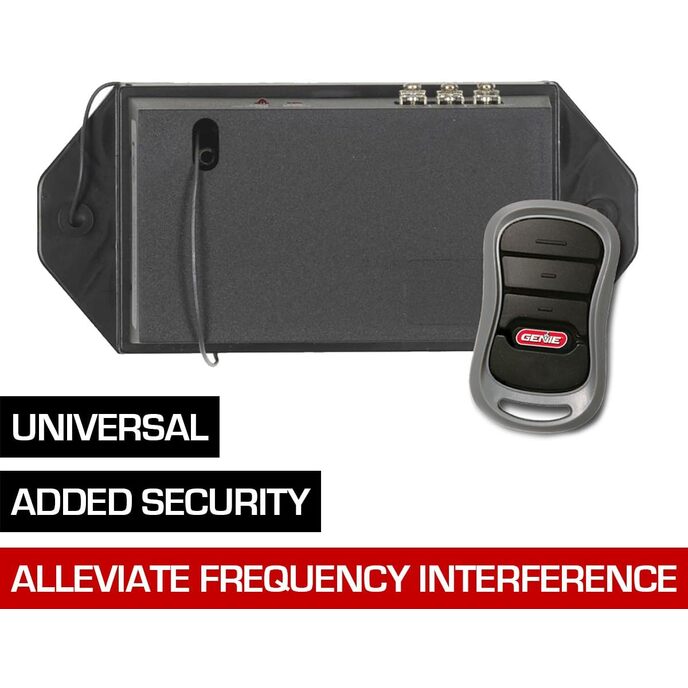
PRODUKTBESKRIVNING Land Mobile Radio (LMR)-system används av militärbaser över hela USA och implementerades som en del av landets insatser för hemlandets säkerhet. Om du har en garageportöppnare som fungerar på frekvenser på 380-400 MHz och du bor inom 50 miles från en militärbas, kan din garageportsöppnare påverkas och verkar ha kort räckvidd. I det här fallet kan Genie GIRUD-1T Universal Conversion Kit hjälpa till. Den fungerar på automatisk sökning med dubbla frekvenser som automatiskt söker antingen 315 eller 390 MHz-frekvensen som produceras av en fjärrkontroll, vilket hjälper till att säkerställa att öppnaren reagerar om det finns frekvensstörningar. Genie Universal Conversion Kit kan också användas för att uppgradera äldre versioner av garageportöppnare (tillverkade från 1993 till 1995) som kan ha mindre säker teknik. Detta kit lägger till Intellicode-säkerhetsteknologi – som automatiskt ändrar åtkomstkoden vid varje användning ¬– till din äldre öppnare, vilket hjälper till att förhindra obehörig åtkomst till ditt garage. GIRUD-1T-satsen kommer med allt du behöver för en enkel installation och installation. Installationsinstruktioner guidar dig genom monteringsprocessen för den universella dubbelfrekvensmottagaren, plug-in 12v transformator och G3T-R fjärrkontrollsändare. Satsen innehåller tråd och trådklämmor samt monteringsskruvar. Genie GIRUD-1T Universal Dual Frequency Conversion Kit för din garageportöppnare. FRÅN TILLVERKAREN Genie Universal Dual Frequency Radio Conversion Kit #GIRUD-1T

KOMPATIBEL MED DE FLESTA STORA VARUMÄRKEN: Har du ingen Genie garageportöppnare? Inga problem. GIRUD är universell. INKLUDERAR TILLBEHÖR: Satsen levereras med mottagarbox, transformator, trådlös fjärrsändare, sladd och klämmor, monteringsskruvar och instruktioner. UPPGRADERAR GAMLA GARAGEDÖRRÖPPARE: Uppgraderar eller lägger till Intellicode-säkerhet till äldre öppnare. SÖKER AUTOMATISKT RÄTT FREKVENS: Universal Dual Frequency Kit söker automatiskt 315 eller 390 Mhz så att din öppnare svarar oavsett närliggande störningar. MINSKAR FREKVENSSTÖRNING: Genie GIRUD-1T är designad för att lindra frekvensstörningar från implementerade landmobilradiokommunikationssystem som orsakar kortare öppningsräckvidd.
Batteries Included? ‎Yes
Batteries Required? ‎No
Brand Genie
Color Black
Color ‎Black
Country of Origin ‎China
Customer Reviews 4.5 4.5 out of 5 stars 1,086 ratings 4.5 out of 5 stars
Description Pile ‎Lithium
Domestic Shipping Item can be shipped within U.S.
Included Components Receiver box, plug adapter, wiring
Included Components ‎Receiver box, plug adapter, wiring
International Shipping This item can be shipped to select countries outside of the U.S. Learn More
Is Discontinued By Manufacturer ‎No
Item Dimensions LxWxH 2.75 x 7 x 8.5 inches
Item model number ‎Model GIRUD-1T
Item Package Quantity ‎1
Item Weight 1.26 Pounds
Item Weight ‎1.26 pounds
Manufacturer ‎Genie
Part Number ‎36359R
Power Source ‎Battery-powered
Product Dimensions ‎2.75 x 7 x 8.5 inches
Warranty Description ‎Limited 1 Year Warranty

3.6

8 Review
5 Star
76
4 Star
13
3 Star
5
2 Star
1
1 Star
5

Skriv din recension

Din e-post kommer inte att publiceras. Alla obligatoriska fält är markerade med*

Scritto da: Gadget Fan in CA
Cheap fix at $35, five stars if you don't mind seating the circuit board
My garage door opener was getting to the point where I was certain I had to replace the whole thing. The range of the remotes kept getting shorter and I was never certain if a button press would open the door resulting in quite a bit of frustration. Just what I needed to hassle with in this county's crazy quilt of good and bad neighborhoods. The remotes were falling apart and despite me soldering in new buttons and what not I didn't think the last working remote would last much longer and I was having problems finding replacements. I tried making the antenna bigger and bending it into different shapes but I could only reduce the operating range. In addition there have been a couple late night garage burglaries around the neighborhood and I wanted to upgrade to the rolling code receiver. The GIRUD-1T I received had the same problem others have reported with the loose circuit board but it wasn't too hard to correct. To determine if the circuit board is loose look at the holes in the bottom side of the unit (with the unit oriented like it was mounted on a wall). Four silver screws should be protruding from a hole. If you don't see the screws the board is definitely loose. If you push the screws with your finger the screws should not move. If they move up into the cover then the circuit board is loose. You should also be able to see two small holes next to those screws. You should be able to see an LED in one and tiny button in the other. You need access to those to program your remotes. Here is a brief summary of how I re-seated the circuit board in mine: 1. Find a good work surface because the circuit board is loose inside the cover and you don't want to drop it on the floor. 2. Look on the back and note where the clips protrude through the base. You want to squeeze on those sides until the clips let the cover come off. It's thin plastic so be gentle with it. You may have to jiggle and work it a little to get it to pop off. 3. The circuit board will just be laying there and that's why you have to be careful not to let it fall out. 4. Decide which side will be the bottom, that is the side the screws the power and control wires will be attached to is on. 5. Slid the bottom of the circuit board into the notches in the bottom posts and under the plastic clip in the center. Make sure the corners of the board go into the notches on the posts, line up perfectly and go in completely and it's firmly under the notch in the clip. 6. Rotate the board down making sure it stays under the clip and in the post notches on the bottom. 7. When it touches the clip on the top push up on that clip so the board can push by it and into the notch on the clip without a lot of pressure. When that happens the top corners should be in the notches in the top posts. Be careful not to bend that clip too much. The plastic feels like it could crack if bent too much. At this point it should securely held in place and not want to pop out. If not, remove the circuit board and start at step 5 again. It took me a couple tries to get it in right. If another person or a vise can hold the base for you I think that would make it easier to install the circuit board. 8. Put the cover on. Make sure the holes in the cover match up with the 4 screws that you will be attaching wires to later. Push the clips on the cover through the holes in the base place until they click into place. 9. Then follow the directions that came with the receiver to set it up. Note that it comes with one spool of wire. Remember that wire is used to connect both the receiver to the power source (e.g. transformer) and to the opener so at some point you'll have to cut it. This receiver has worked out great for me. I went from having to be less than a car length away from the door for it to receive the signal to it working from far enough away the door is up enough to drive in by the time I reach the garage. The new remotes are tiny and run on coin cell batteries. I only have to push the button on them once and door responds versus the one, two, three, four or more times with the old remotes. I set it up a month ago and for the $35 I think it's a great deal. The remotes sell for $20 separately so in a way I paid $15 for the receiver. The increase in range might be questionable security-wise but the big wins to me are that it opens reliably when I press the remote button and that I can obtain additional/replacement remotes. If you want the receiver because you are concerned about the security of your current remote control system, don't forget you have to disable the old receiver. I suggest waiting a month or two so you're sure the GIRUD-1T you installed is working correctly and reliably and then you can cut or in some other way disable the old antenna wire so the old receiver can't receive a signal. The other thing I found confusing was determining which remote was included because product photos showed two different remotes. Mine came with the G3T-R:Genie G3T-R Intellicode2 3-Button Remote It's about the size of a car alarm remote. Just measured it and it's about 2-3/4" x 1-5/8" x 3/4" without the visor clip installed. Quick note: The way the burglars got into a couple garages was to slide a wire or similar in above the door and using it to hook the emergency release cord and pull it so they could open the door manually. The cheap sliding pot-metal "locks" optional on some doors were bent by whatever they were using for leverage to raise the door. So something far more substantial has to be used to block the wheels in the track. A C-Clamp, big bolt, etc. This of course only works if you lock it from the inside and that can only be done after all the cars, etc. are in for the night. The other option is to remove the emergency release cord. If that door is the only exit from the garage you have to be careful about doing that to make sure someone isn't trapped in the garage during a fire, etc. The work around suggested by an alarm company is to keep a wire hanger with a hook shape bent into the end somewhere in the garage (not hanging off the emergency release of course) and if the door has to be opened the person hooks the wire through the release and pulls. Simple but it could be an issue in the confusion during an emergency not mention consume what might be precious seconds. If you are leaving for a long weekend or vacation it might be a good idea to put the bolts etc. into the tracks and exit the garage from a more secure door.
Scritto da: Wallheater
Overpriced for its build quality, but works. Runs on same 24 VAC as old rx.
I used this to replace the receiver module on an older -- but mechanically perfect -- Allister/Allstar GDO (Access 3500). Now I have Intellicode rolling codes instead of DIP switches, and can add a wireless keypad. PROS I was dreading adding the supplied transformer to the system, but luckily it's the same 24 Volts AC as the GDO head unit already supplies on its terminal block, so I just hooked it up to that. (Not hard to figure out with a multimeter.) Pairing with the supplied remote worked fine. I did not need to re-seat the PCB, as others have mentioned. CONS The receiver box itself looks cheap AF... lightweight, ugly, mostly empty, antenna wire dangling out of an open hole with no strain relief. "Learn" button is tiny and almost recessed. Insulting for a $75 big-brand product. If I had found a knock-off on this site, I would definitely have tried it. Supplied transformer is big and heavy and I'm sure will fall out of an overhead power outlet like mine. If you need it, prepare to rig up some retention. Mine will go in a junk drawer. Supplied white two-conductor wire would work, but asking for trouble to use identical cable for power and control, especially if you just need three wires from the head unit. Try some thermostat or bell wire instead.
Scritto da: caoresi
Wife approved fix to rejuvenate old garage door opener
Quick and easy install with painless remote pairing. I've upgraded our 65 year old home to a smart home, in our house we have mesh wifi 6E, ZigBee and Z-Wave. I realized with all the wireless signal in our house and neighbors it drowned out our garage door opener remotes. I tried ZigBee and Z-Wave garage door relay but the wife didn't approve. Each time you leave the house and come back the ZigBee and Z-Wave remotes had to sync back up with the hub and this took a few minutes after that you will have to push the button on the remote again for the garage door to actuate. Sometimes the sync process didn't work so you're stuck in the driveway trying the remote. Next solution was to use a MyQ smart controller, this didn't work at all. MyQ only worked through the app, thus you need to dig out your phone, unlock it, find the app and tap the screen to actuate the door. This was just as bad as the z-wave and ZigBee solution. So when I came across this product it sounded like a potential solution. Ordered it, once arrived I got it installed and programmed within ~5mins, this thibg WORKS! Wife approved the solution, she gets to use a old fashion garage door remote and it also works with home link garage door remotes. TLDR: this works great, I'm going to order 2 more one to use on our automatic gate and one to restore function to my mom's garage door.
Scritto da: Peter
Great product for the old garage opener.
Great to make old garage opener to work again. But it is pricy. Paying hundred more can have a new opener. This is the one for lazy person like me don't want to change the opener
Scritto da: David
Super easy to install
So easy to install and works perfectly. Really impressed with this product. I hardly ever write reviews but had to for this.
Scritto da: Michael
Excellent for retro fit to older system.
Works great to simulate button press on garage door system.
Scritto da: Rockwood Joe
Perfect - If it fits your application!
The purpose of this kit is really only two-fold: 1) Eliminate any frequency interference issues (ie. you live near radio towers, military bases, etc.) and/or 2) Upgrade your old garage door opener to the Genie Remote system. In my case, number 2 was the primary reason, as I had an obsolete (LYNX) garage door opener that was fine, but the broken remote was unattainable. As other reviewers have mentioned: 1) Instructions are somewhat inconsistent - very detailed in some parts, too sparse in others. Regardless, just look at the wiring diagram and follow that. The written portion is somewhat confusing. Genie decided to put everything on one large sheet of paper to save costs. A more verbose booklet with more diagrams would've helped considerably. 2) It comes with a 24VAC adapter, which does require a 120v outlet nearby, or attach it to the one your garage door opener is plugged into. Since my 120v outlet was upside down, I had to fabricate a bracket to hold the 24VAC so it wouldn't fall out over time. Many garage door openers also have 24VAC output, so you might be able to dispense with using the adapter for a cleaner and simpler install. I learned all this AFTER fabricating and installing my bracket. So, spend some time planning out the wiring if you can. The quality of the receiver unit is suitable for the purpose. Nothing more, nothing less. Regardless, I'm happy with the kit, as it allowed to postpone purchasing a new garage door opener for a few years.
Scritto da: Client Amazon
Easy to install and seems to work OK
Installed only yesterday. Do not know about long time usage

Relaterade produkter

Upptäck vårt internationella nätverk

Vi skickar till 28 länder, över 200 000 produkter. Håll dig uppdaterad, prenumerera på nyhetsbrevet.

Array